The Challenges of Cutting a Large Gem Opal Rough
ABSTRACT
Cutting large gem-quality opal rough poses special challenges not encountered when working with smaller pieces. The author explains the considerations in cutting a 3,019 ct piece of gem-quality white opal that was mined from the Olympic Field in Coober Pedy, South Australia, during the 1950s. Through careful analysis and planning, he was able to extract a single finished gem weighing 1,040 ct, with play-of-color across the entire surface. Named the Molly Stone, it is one of the largest fine gem opals ever cut. This article describes the unique factors involved in maximizing its size and play-of-color.
INTRODUCTION
Opal has long been considered one of the most beautiful gemstones in the world, as it displays all the colors of the visible spectrum and each gem is unique. With faceted gemstones, the cutter lays in a pattern of facets at precisely calibrated angles, transforming the rough from a transparent pebble into a brilliant gem. With opal, the beauty is often hidden within the stone, and it is the cutter’s skill that determines whether this beauty is exposed or lost. With faceted gems, mistakes can often be corrected. But with opal, the moment you make the wrong cut the beauty is lost forever, and the stone becomes an ugly gray piece of silica.
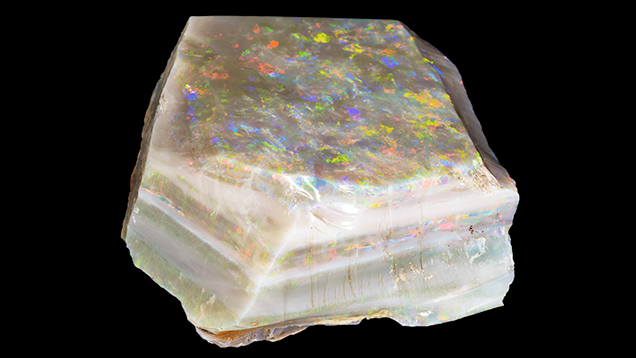
Sometime during the 1950s, miners recovered an enormous piece of seam opal from the Olympic Field in Coober Pedy, South Australia. The decision was made to “face” the stone, which is simply taking it to the lap wheel and grinding a colorless overlying potch layer down to the color bar to see if there is a strong, uniform play-of-color underneath (figures 1 and 2). I have worked with many pieces of opal rough where the color bars have shown brilliant play-of-color when viewed from the side but faint, ghost-like colors when viewed from the top. In that case, the best option is to cut small stones using the side of the color bar as the top, maximizing the richness of color. Figure 3 shows where a small nip was taken from the top, exposing the second large color bar.


Whoever mined and faced this rough opal decided to let someone else take the risk of further work on it. At some point the 3,019 ct piece was sold to Lawrence H. Conklin, a noted dealer and collector in New York. After the opal passed through several more hands, I had the good fortune to purchase it in 2014. Based on my 40 years of experience cutting thousands of opals (see Grussing, 1982), I decided to undertake the unique challenge of cutting this large gemstone while documenting the decision-making process and the techniques for the benefit of other lapidarists and gem enthusiasts. I spent innumerable hours over many months looking at the rough under different lighting conditions, considering all the possibilities before I began to map the cuts.
EXAMINATION AND EVALUATION
In this specimen, there are multiple layers of silica gel from which the opal has formed. Some of these layers or bars are precious opal, and others are common opal with no play of color (potch). The thickness and color quality of these bars vary throughout the stone. The color bars seemed relatively consistent, but there was the distinct possibility that they undulated and varied in thickness, perhaps narrowing down or even disappearing. The opal’s top surface displayed full and intense color from every angle and in any lighting. The remainder of the piece had four more thick color bars separated by layers of potch; at least three of these color bars appeared to have very strong play-of-color (again, see figure 1).
There were a few conchoidal fractures on the edges extending into the top color bar on the surface. These occurred during the mining process or when someone later nipped it. Two of the sides still had the original skin, which left a thin layer of potch over the color bars. The question was how thick the bars were and how strong the color was beneath the skin. A few very small areas on the top appeared to be slightly “sand shot,” with sand embedded in the silica gel. I wondered how these areas could be removed without going through the top color bar, which appeared to be about 2 mm thick.
There were three options for the rough:
Leaving the 3,019 ct Opal Intact. Leaving the piece of rough intact would retain the mystery of the opal and the element of wonder as to what gems it might produce. Though it was a beautiful, very large example of gem-quality opal in its natural state, this was the least attractive option commercially. Besides, I already knew the stone in this form, and it is not in my nature to simply do nothing: There was a stone to explore and a risk to be taken. For me, leaving it alone was not an option.
Cutting Individual Gems or Matching Suites for Jewelry Use. Cutting the rough for jewelry pieces would maximize the value of the gem material. I estimated it would produce 1,000–1,200 carats of high-quality gemstones, with the larger ones weighing 50 to 75 carats each. Choosing this option would mean at least two, possibly three horizontal cuts through potch layers. Individual stones could be cut from each of the slabs, two of them with strong color bars. The lower color bars would produce good commercial-quality gemstones; the better ones would be exceptional.
Cutting a Museum-Quality Specimen. While cutting a single large stone would probably result in a lower total value than cutting many smaller gemstones, there are only a handful of extremely large gem opals in the world. After evaluating the rough, I thought it would be possible to get a single fine opal weighing over 1,000 ct. This was the riskiest option because of all that could go wrong in the process, but the temptation of creating something truly special while preserving the integrity of such a treasure was irresistible.
For more than 70 years, the opal had looked exactly like this. Two of the sides were still in the original condition; the other sides had been nipped or in some way opened up to expose thick color bars that appeared to penetrate the stone in a relatively even manner and on a slight angle without significant undulations. The top color bar was obviously beautiful, and part of the potential had been uncovered. But what magical display of color was still locked within?
MAKING THE FIRST CUT
I decided on the third option: creating a single large collector/museum piece. I spent hours with an intense light, mapping the stone to make an informed decision on where the cut would be.
In choosing which side would be the top of the stone, it was necessary to determine what the bottom color layer looked like. This could not be determined with certainty until the cut was made. The color bars appeared relatively level on all sides, so a saw cut through the intervening layers of potch would not sacrifice much of the valuable precious opal. I did find some small conchoidal fractures in the surface and color bars that faded out toward the edges, as seen in figure 1. There were a few very small areas of sand embedded on the top surface, but for my purposes, the entire top surface needed to be free of blemishes. My concern was that using a diamond wheel to remove them would cause me to cut through the color bar, so I decided to use polishing slurry instead. If the sand blemishes could not be removed, I would have to choose another color bar to be the top layer, and hundreds of carats would be lost.
To verify the quality of the color bars, I ground down the sides of the opal to a reasonably flat face. I also did some grinding in from the side to see the top of the color bar that appears second from the top in figure 3. My plan was to make the cut near the bottom of the potch layer below this large color bar; I would then remove the potch to bring out the beauty of the color bar. My hope was that it would have even better color than the top layer, allowing me to rotate the orientation so that the bottom would become the top of the stone.
Because of the stone’s size, it was impossible to see very far into it, even with a strong light source. The rough gem material looked solid, and strong lighting did not reveal any apparent areas of sand or orange glints that would indicate internal fractures.
By this point, I had a good idea of where I wanted to make the main saw cut. I scribed the circumference of the stone with a black marker, adjusting for the slight undulations in the color bar (figure 4). It appeared I could make a good straight cut near the bottom of the potch layer under the second large color bar, leaving about a millimeter of skin on it.

All the hours of studying the stone were over; now it was time to make the cut and unlock the beauty within. When cutting opal I hold the rough, as this allows me to make very slight adjustments along the way. Holding the material allows flexibility that is not possible when the stone is held in a jig. With this stone, there were no straight or even edges or flats that I could use to safely clamp the crystal in a saw, so using a jig was not even an option.
Shortly after noon on July 4, 2014, with plenty of water in the reservoir, I turned on the saw (Gemstone Equipment Manufacturing with a 10 in. diameter diamond blade, 0.016 in. thick). As the water went flying, I advanced the opal toward the diamond blade (figure 5). In less than five minutes, the deed was done. The cut was perfect, and the beauty within was confirmed. I made three more vertical saw cuts to remove slices where nips had been taken out of the top surface. By making additional cuts with a 6 in. diamond saw blade (0.01 in. thick) rather than grinding on the wheel, I saved three additional pieces of rough that would cut smaller gem-grade opals.

The lower half of the opal had a layer of potch overlaying two additional color bars of medium intensity. This half, along with the other three pieces that were removed, has been preserved so that others can see the process that goes into the mapping, planning, and cutting of large opal rough.
FINISHING TOUCHES
Now it was time to begin the process of grinding the primary stone (figure 6) into a pleasing freeform shape that would maximize the beauty of the opal. After making the horizontal cut, there was about a millimeter of potch overlaying the color bar on the bottom of the primary stone. I ground it down almost to the color bar, which faced well with uniform play-of-color—primarily reds and blues—across the entire surface. As attractive as this lower layer was, the original top color bar still looked better, so I decided to stay with it.

My primary concern during the cutting process was to leave the top color bar essentially intact. The miner or cutter in the field removed the potch down into the color bar itself and, as shown in figure 1, the color bar was thin near the edges. This left little tolerance for removing blemishes on the surface because of the risk of going through the color bar and creating an area on the surface with no play-of-color.
I shaped the stone on my custom-made lapidary machine using 6 in. × 2.5 in. diamond wheels. Opal is rather “shocky,” and too coarse of a grit can cause chipping, so I selected a 180 grit wheel for the initial shaping. From there I used a succession of 260, 600, 1200, and 14,000 grit wheels to remove the drag lines or scratches from each preceding wheel. The final shaping and polishing (figure 7) was done with a combination of cerium and tin oxides in a slurry on a flat pad. This is a very messy process, but it produces a near-perfect polish. The polishing slurry also removed the small sand blemishes on the surface. Note the two-inch aluminum tape affixed to the top of the cover over the polishing pad, which was used to catch excess slurry as it came off the wheel—crude but effective.

The resulting 1,040 ct opal has play-of-color visible on virtually every side and from every angle. It is difficult to compare this stone with other large opals because there are so many variables involved. It is literally a handful of gem opal (figure 8), and there are few of its size and quality in any collection.

Every important gem deserves a name, and the author chose to name this one after his beloved dog. The Molly Stone (figure 9) is currently on loan to the Gemological Institute of America museum in Carlsbad, California, where it is on display in the Education wing.